Introduction: Why Baked Chiles Rellenos Deserve a Spot on Your Table
If you have ever ordered chiles rellenos at a Mexican restaurant, you know how special the dish feels. A smoky roasted pepper, a molten cheese filling, and a savory sauce all come together in one unforgettable bite. The traditional version, however, involves battering, frying, and a fair amount of kitchen stress. That is exactly why baked chiles rellenos have become such a popular alternative for home cooks.
This baked Mexican chiles rellenos recipe keeps everything you love about the classic dish and swaps the hot oil for your oven. Tender roasted peppers are filled with melty cheese, covered in a savory tomato and green chile sauce, and baked until golden and bubbling. The result is rich, comforting, and packed with authentic Mexican-inspired flavor. It is the kind of meal that brings everyone to the table for seconds.
In this complete guide, you will learn exactly how to make baked chiles rellenos from scratch, which peppers and cheeses work best, how to roast and peel chiles like a pro, how to avoid the most common mistakes, and how to serve, store, and reheat leftovers. Whether you are a beginner or a seasoned cook, this recipe is simple enough for a weeknight and impressive enough for guests.
What Are Chiles Rellenos?
Chiles rellenos translates from Spanish as “stuffed chiles.” The dish is a beloved classic of Mexican cuisine, traditionally made with poblano peppers that are roasted, peeled, stuffed with cheese or seasoned meat, coated in an airy egg batter, fried, and served in a tomato-based sauce. Regional versions across Mexico use different fillings, from queso fresco and Oaxaca cheese to picadillo with raisins and almonds.
The baked version is a lighter and far easier interpretation. Instead of frying, the stuffed peppers are nestled in a baking dish, smothered in sauce, topped with more cheese, and cooked in the oven. You still get the smoky pepper, the gooey center, and the savory sauce, but with less mess and no deep-frying. Many cooks also describe it as a chiles rellenos casserole, because the peppers bake together in the sauce and are served straight from the dish.
Why You Will Love This Baked Chiles Rellenos Recipe
There are plenty of reasons this recipe earns a permanent place in your rotation:
- No frying required. Skip the batter, the oil splatter, and the cleanup. The oven does the work.
- Big flavor, simple ingredients. Roasted chiles, three kinds of cheese, crushed tomatoes, green chiles, garlic, onion, and oregano create layers of taste without anything complicated.
- Make-ahead friendly. The sauce can be prepared in advance, and the peppers can be stuffed ahead of time, making this a stress-free dinner party option.
- Naturally vegetarian. With the chicken broth swapped for vegetable broth, the dish is meat-free and still deeply satisfying.
- Low-carb and gluten-free friendly. Because there is no breading or flour batter, the recipe fits many dietary preferences as written.
- Perfect for family dinners. The cheesy, golden top appeals to both kids and adults, and the mild flavor can easily be adjusted to your heat level.
Ingredients for Baked Mexican Chiles Rellenos
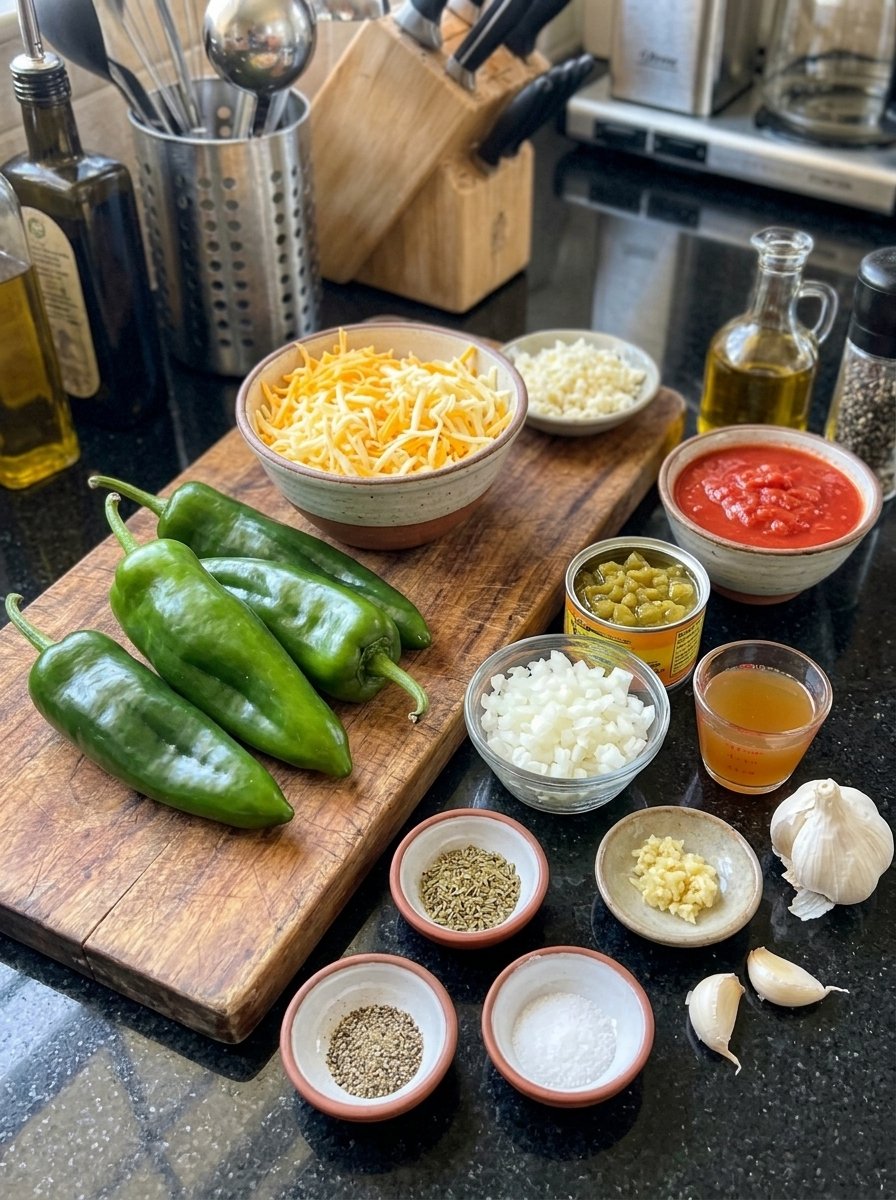
This recipe uses a short list of pantry-friendly ingredients. Here is everything you need:
- 4 large Anaheim or Pasilla (poblano) chiles
- 2 cups shredded cheese, such as cheddar, Monterey Jack, and cotija
- ½ cup crushed tomatoes
- 1 can (4 oz) diced green chiles
- ¼ cup chicken broth
- 1 tablespoon dried oregano
- 2 cloves garlic, minced
- ½ teaspoon garlic powder
- ½ cup diced onion
- Salt and black pepper, to taste
- 1 tablespoon olive oil or nonstick cooking spray, for greasing the baking dish
Ingredient Notes and Smart Substitutions
The peppers. Large Anaheim or pasilla chiles are the best choice because they are sturdy, easy to stuff, and hold their shape well during baking. In the United States, fresh pasilla chiles are often sold under the name poblano, so either label works. Poblanos tend to have a deeper, earthier flavor with mild to medium heat, while Anaheim chiles are slightly sweeter and gentler. Look for peppers that are wide, straight, and smooth, with firm skin and no soft spots. Straighter peppers are easier to roast evenly and much easier to fill.
The cheese. A mix of cheeses gives the best result. Monterey Jack melts beautifully and creates that stretchy, gooey texture. Cheddar adds sharpness and color. Cotija brings a salty, crumbly, traditional Mexican flavor. If you cannot find cotija, a little feta or Parmesan can stand in for the salty note, and Oaxaca cheese or pepper jack are excellent alternatives for melting. For the best texture, shred your own cheese from a block, since pre-shredded cheese often contains anti-caking agents that can keep it from melting smoothly.
The sauce. Crushed tomatoes and canned diced green chiles create a bright, savory base. Chicken broth thins the sauce slightly and adds depth, but vegetable broth works perfectly for a vegetarian version. Dried oregano, garlic, garlic powder, and onion round out the flavor. If you prefer more heat, add a pinch of chili flakes or a diced jalapeño to the sauce.
Tips for the Best Baked Chiles Rellenos
A few simple techniques make the difference between good and truly great stuffed peppers:
- Choose sturdy peppers. Large Anaheim or pasilla chiles are easier to stuff and hold up well in the oven without collapsing.
- Roast until blistered. Properly charred skins are much easier to peel and add a delicious smoky flavor. Do not be afraid of blackened spots; that char is where the flavor lives.
- Let the peppers steam. Covering the hot peppers for about 10 minutes loosens the skins without drying out the flesh underneath.
- Mix your cheeses. Monterey Jack melts, cheddar sharpens, and cotija seasons. Together they create a more interesting filling than any single cheese.
- Do not overfill. Leave enough room to close the slit so the cheese stays inside as it melts.
- Make the sauce ahead. The tomato and green chile sauce can be prepared in advance and refrigerated until you are ready to assemble the casserole.
- Pat the peppers dry. Excess moisture can water down the sauce and make the cheese slide off, so dry each pepper well before stuffing.
How to Make Baked Chiles Rellenos Step by Step
Step 1: Roast the Chiles
Preheat your broiler. Arrange the Anaheim or pasilla chiles on a baking sheet and broil, turning occasionally, until the skins are blistered and blackened on all sides. This usually takes 10 to 15 minutes depending on your broiler. You can also roast the peppers directly over a gas flame, turning carefully with tongs. An outdoor grill works wonderfully too and adds an extra layer of smokiness.
Step 2: Steam and Peel the Peppers
Transfer the hot chiles to a heat-safe bowl and cover, or place them in a sealed heat-safe bag. Let them steam for about 10 minutes. The trapped steam loosens the charred skin from the flesh. Once the peppers are cool enough to handle, gently rub away the loosened skins with your fingers. Avoid rinsing the peppers under water, because that washes away the smoky flavor you worked to create. A few stubborn flecks of skin are perfectly fine.
Step 3: Prepare the Chiles for Stuffing
Make a lengthwise slit down one side of each pepper, being careful not to cut all the way through. Keep the stems attached, since they make the peppers look beautiful and give you a handy grip. Remove the seeds and membranes if you prefer a milder flavor. Pat the peppers dry with paper towels.
Step 4: Stuff with Cheese
Combine the shredded cheddar, Monterey Jack, and cotija in a bowl. Carefully fill each pepper with the cheese mixture, reserving about ½ cup for the topping. Gently press the openings together to help keep the filling inside. If a pepper tears, simply patch it by overlapping the edges or placing a small piece of another pepper over the hole. The sauce and cheese topping will hide any imperfections.
Step 5: Arrange in the Baking Dish
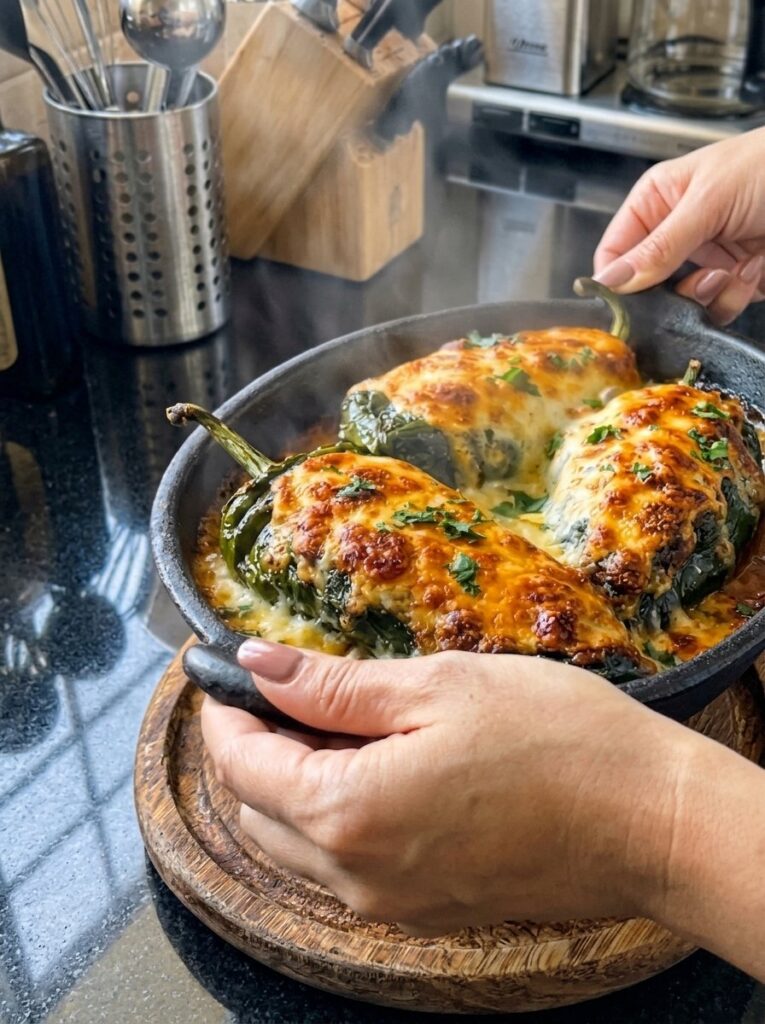
Preheat your oven to 375°F (190°C). Lightly grease a baking dish with olive oil or nonstick cooking spray. Arrange the stuffed chiles seam-side down in a single layer. Placing the seam side down keeps the filling tucked in and helps the peppers hold their shape. A cast iron skillet, as shown in the photo, makes a gorgeous baking and serving vessel.
Step 6: Prepare the Tomato and Green Chile Sauce
Place a saucepan over medium heat. Add the crushed tomatoes, diced green chiles, chicken broth, dried oregano, minced garlic, garlic powder, and diced onion. Stir well to combine.
Step 7: Simmer the Sauce
Bring the sauce to a gentle boil, then reduce the heat to low. Simmer for about 10 minutes, stirring occasionally, until the onion begins to soften and the flavors blend together. Season with salt and black pepper to taste. If the sauce seems too thick, add a splash more broth. If it seems thin, simmer a few extra minutes to reduce it.
Step 8: Cover the Chiles with Sauce
Carefully pour the warm tomato and green chile sauce evenly over the stuffed peppers. Use a spoon to spread it around the dish so each chile is surrounded by the flavorful sauce. Reserve a little sauce for serving if you like extra.
Step 9: Add the Remaining Cheese
Sprinkle the reserved shredded cheese evenly over the chiles and sauce. This creates the delicious, bubbling melted topping as the casserole bakes.
Step 10: Bake Until Golden and Bubbly
Place the baking dish in the preheated oven and bake uncovered for about 25 minutes, or until the peppers are tender, the cheese is melted, and the sauce is bubbling around the edges. For a more golden top with those irresistible browned spots, broil for the final 1 to 2 minutes, watching carefully to prevent burning.
Step 11: Rest Before Serving
Remove the dish from the oven and let the chiles rest for about 5 minutes. This gives the melted cheese a chance to settle and makes serving much easier.
Step 12: Serve Warm
Spoon extra tomato and green chile sauce over each pepper and serve while hot. Garnish with fresh cilantro or parsley for a pop of color. Enjoy the tender roasted chiles, gooey cheese filling, and savory sauce in every bite.
Common Mistakes to Avoid
Under-roasting the peppers. If the skins are not blistered enough, they will cling stubbornly and tear the flesh when you peel. Roast until the surface is mostly black.
Overcooking the peppers. On the other hand, leaving them under the broiler too long can turn the flesh mushy. Turn them often and pull them once the skins are loose.
Skipping the steaming step. Steaming is what makes peeling easy. Even ten minutes covered makes a major difference.
Overstuffing. A packed pepper will split open in the oven and leak cheese into the sauce. Fill generously but leave room to close the slit.
Using wet peppers. Moisture dilutes the sauce and prevents the cheese from browning. Always pat dry.
Skipping the rest time. Cutting in immediately causes the cheese to run everywhere. A short rest keeps the filling creamy and the plate neater.
Variations to Try
Once you master the base recipe, there are endless ways to make it your own:
- Meaty chiles rellenos. Add cooked ground beef, shredded chicken, or chorizo to the cheese filling for a heartier meal.
- Vegetarian and vegan options. Use vegetable broth, and fill the peppers with sautéed mushrooms, corn, black beans, or a plant-based melting cheese.
- Spicy version. Mix diced jalapeños or a pinch of cayenne into the sauce or filling.
- Extra cheesy. Swap in Oaxaca cheese, queso quesadilla, or pepper jack for an even stretchier pull.
- Spinach and cheese. Fold sautéed spinach or chopped herbs into the filling for a fresh, green twist.
- Air fryer method. For single servings, finish a stuffed pepper in the air fryer for a crisp, golden top.
- Red sauce or green sauce. Replace the tomato sauce with salsa verde or a smooth ranchero sauce for a different regional feel.
What to Serve with Baked Chiles Rellenos
Baked chiles rellenos are rich and satisfying on their own, but the right sides make the meal feel complete:
- Mexican rice or cilantro-lime rice to soak up the sauce
- Refried beans or whole pinto beans for creamy contrast
- Warm corn or flour tortillas for scooping up cheese and sauce
- A crisp green salad with lime vinaigrette to cut through the richness
- Pico de gallo, guacamole, or sliced avocado for freshness
- Elote or grilled street corn for a sweet, smoky side
- A dollop of sour cream or Mexican crema for a cool, tangy finish
For drinks, try a cold agua fresca, a lime-forward margarita, a crisp Mexican lager, or sparkling water with citrus.
How to Store, Freeze, and Reheat Leftovers
Refrigerator. Let the dish cool, then cover it tightly or transfer the peppers and sauce to an airtight container. Leftovers keep for 3 to 4 days in the refrigerator.
Freezer. For best results, freeze the stuffed peppers before baking. Assemble them in a freezer-safe dish, cover tightly, and freeze for up to 2 months. Thaw overnight in the refrigerator, then bake as directed, adding a few extra minutes if needed. You can also freeze the baked leftovers for up to 1 month, though the peppers will be a little softer after thawing.
Reheating. Warm leftovers in a 350°F (175°C) oven, covered with foil, for 15 to 20 minutes until heated through. Remove the foil for the last few minutes to re-crisp the cheese. A microwave works in a pinch, but the oven preserves the texture better.
Make-ahead plan. Roast, peel, and stuff the peppers up to a day in advance and keep them refrigerated. Prepare the sauce separately. When you are ready to cook, assemble, top, and bake.
Nutrition and Dietary Notes
Because this recipe is baked rather than fried and contains no flour or egg batter, it is lighter than traditional chiles rellenos. Peppers provide fiber, vitamin C, and vitamin A, while the cheese delivers protein and calcium. To lighten it further, use part-skim cheese or reduce the amount of cheese slightly. To make it fully vegetarian, replace the chicken broth with vegetable broth. As written, the dish contains no gluten ingredients, but always check labels on canned goods and broth if you are cooking for someone with celiac disease or a sensitivity.
Frequently Asked Questions About Baked Chiles Rellenos
What is the difference between poblano and pasilla peppers?
In many US grocery stores, fresh poblano peppers are labeled “pasilla,” which causes plenty of confusion. In Mexico, a pasilla is actually a dried chilaca pepper, while the fresh dark green pepper used for chiles rellenos is the poblano. For this recipe, either label works as long as the pepper is large, dark green, and sturdy enough to stuff.
Can I use Anaheim peppers instead of poblanos?
Yes. Anaheim chiles are milder and a little sweeter, and their long shape makes them easy to stuff. They are a great choice for anyone who wants less heat.
Are baked chiles rellenos spicy?
Usually they are mild to medium. Poblanos have gentle heat, and removing the seeds and membranes reduces it further. If you like more spice, leave some seeds in or add jalapeño to the sauce.
Do I have to roast the peppers first?
Roasting is essential. It softens the flesh, loosens the tough skin, and adds a smoky flavor that defines the dish. Skipping this step will leave you with chewy skins and a flat taste.
How do I keep the cheese from leaking out?
Do not overfill, press the slit closed, and place the peppers seam-side down in the baking dish. Reserving some cheese for the topping also prevents the filling from overflowing.
Can I make baked chiles rellenos ahead of time?
Absolutely. You can roast, peel, stuff, and refrigerate the peppers a day ahead, and the sauce keeps well in the refrigerator too. Assemble and bake when you are ready to serve.
Can I freeze baked chiles rellenos?
Yes. Freeze the stuffed, unbaked peppers for up to 2 months, or freeze baked leftovers for up to 1 month. Thaw in the refrigerator and reheat in the oven.
What cheese is best for chiles rellenos?
Monterey Jack, Oaxaca, and queso quesadilla are the best melting cheeses. Combining one of them with cheddar for sharpness and cotija for saltiness gives the most flavorful result.
Can I make this recipe vegetarian?
Yes. Simply use vegetable broth instead of chicken broth, and the recipe is vegetarian.
What can I use instead of a baking dish?
A cast iron skillet, oven-safe casserole, or ceramic baking dish all work. A skillet gives you a rustic, restaurant-style presentation that goes straight from oven to table.
Final Thoughts: A Comforting Classic Made Easy
Baked Mexican chiles rellenos prove that you do not need a deep fryer or hours in the kitchen to enjoy one of Mexico’s most beloved dishes. With smoky roasted peppers, a creamy blend of three cheeses, and a warm tomato and green chile sauce, every bite is rich, comforting, and full of flavor. The oven handles the hard part, giving you a golden, bubbling, cheesy top that looks as good as it tastes.
Make them for a cozy weeknight dinner, a weekend gathering, or a meatless Monday that nobody will complain about. Serve them hot with rice, beans, and warm tortillas, and watch the table go quiet in the best possible way. If you try this recipe, leave a comment with your favorite cheese blend, and share it with a friend who loves Mexican food as much as you do.
Print
Baked Mexican Chiles Rellenos
Ingredients
This recipe uses a short list of pantry-friendly ingredients. Here is everything you need:
- 4 large Anaheim or Pasilla (poblano) chiles
- 2 cups shredded cheese, such as cheddar, Monterey Jack, and cotija
- ½ cup crushed tomatoes
- 1 can (4 oz) diced green chiles
- ¼ cup chicken broth
- 1 tablespoon dried oregano
- 2 cloves garlic, minced
- ½ teaspoon garlic powder
- ½ cup diced onion
- Salt and black pepper, to taste
- 1 tablespoon olive oil or nonstick cooking spray, for greasing the baking dish
Ingredient Notes and Smart Substitutions
The peppers. Large Anaheim or pasilla chiles are the best choice because they are sturdy, easy to stuff, and hold their shape well during baking. In the United States, fresh pasilla chiles are often sold under the name poblano, so either label works. Poblanos tend to have a deeper, earthier flavor with mild to medium heat, while Anaheim chiles are slightly sweeter and gentler. Look for peppers that are wide, straight, and smooth, with firm skin and no soft spots. Straighter peppers are easier to roast evenly and much easier to fill.
The cheese. A mix of cheeses gives the best result. Monterey Jack melts beautifully and creates that stretchy, gooey texture. Cheddar adds sharpness and color. Cotija brings a salty, crumbly, traditional Mexican flavor. If you cannot find cotija, a little feta or Parmesan can stand in for the salty note, and Oaxaca cheese or pepper jack are excellent alternatives for melting. For the best texture, shred your own cheese from a block, since pre-shredded cheese often contains anti-caking agents that can keep it from melting smoothly.
The sauce. Crushed tomatoes and canned diced green chiles create a bright, savory base. Chicken broth thins the sauce slightly and adds depth, but vegetable broth works perfectly for a vegetarian version. Dried oregano, garlic, garlic powder, and onion round out the flavor. If you prefer more heat, add a pinch of chili flakes or a diced jalapeño to the sauce.
Instructions
Preheat your broiler. Arrange the Anaheim or pasilla chiles on a baking sheet and broil, turning occasionally, until the skins are blistered and blackened on all sides. This usually takes 10 to 15 minutes depending on your broiler. You can also roast the peppers directly over a gas flame, turning carefully with tongs. An outdoor grill works wonderfully too and adds an extra layer of smokiness.
Transfer the hot chiles to a heat-safe bowl and cover, or place them in a sealed heat-safe bag. Let them steam for about 10 minutes. The trapped steam loosens the charred skin from the flesh. Once the peppers are cool enough to handle, gently rub away the loosened skins with your fingers. Avoid rinsing the peppers under water, because that washes away the smoky flavor you worked to create. A few stubborn flecks of skin are perfectly fine.
Make a lengthwise slit down one side of each pepper, being careful not to cut all the way through. Keep the stems attached, since they make the peppers look beautiful and give you a handy grip. Remove the seeds and membranes if you prefer a milder flavor. Pat the peppers dry with paper towels.
Combine the shredded cheddar, Monterey Jack, and cotija in a bowl. Carefully fill each pepper with the cheese mixture, reserving about ½ cup for the topping. Gently press the openings together to help keep the filling inside. If a pepper tears, simply patch it by overlapping the edges or placing a small piece of another pepper over the hole. The sauce and cheese topping will hide any imperfections.
Preheat your oven to 375°F (190°C). Lightly grease a baking dish with olive oil or nonstick cooking spray. Arrange the stuffed chiles seam-side down in a single layer. Placing the seam side down keeps the filling tucked in and helps the peppers hold their shape. A cast iron skillet, as shown in the photo, makes a gorgeous baking and serving vessel.
Place a saucepan over medium heat. Add the crushed tomatoes, diced green chiles, chicken broth, dried oregano, minced garlic, garlic powder, and diced onion. Stir well to combine.
Bring the sauce to a gentle boil, then reduce the heat to low. Simmer for about 10 minutes, stirring occasionally, until the onion begins to soften and the flavors blend together. Season with salt and black pepper to taste. If the sauce seems too thick, add a splash more broth. If it seems thin, simmer a few extra minutes to reduce it.
Carefully pour the warm tomato and green chile sauce evenly over the stuffed peppers. Use a spoon to spread it around the dish so each chile is surrounded by the flavorful sauce. Reserve a little sauce for serving if you like extra.
Sprinkle the reserved shredded cheese evenly over the chiles and sauce. This creates the delicious, bubbling melted topping as the casserole bakes.
Place the baking dish in the preheated oven and bake uncovered for about 25 minutes, or until the peppers are tender, the cheese is melted, and the sauce is bubbling around the edges. For a more golden top with those irresistible browned spots, broil for the final 1 to 2 minutes, watching carefully to prevent burning.
Remove the dish from the oven and let the chiles rest for about 5 minutes. This gives the melted cheese a chance to settle and makes serving much easier.
Spoon extra tomato and green chile sauce over each pepper and serve while hot. Garnish with fresh cilantro or parsley for a pop of color. Enjoy the tender roasted chiles, gooey cheese filling, and savory sauce in every bite.