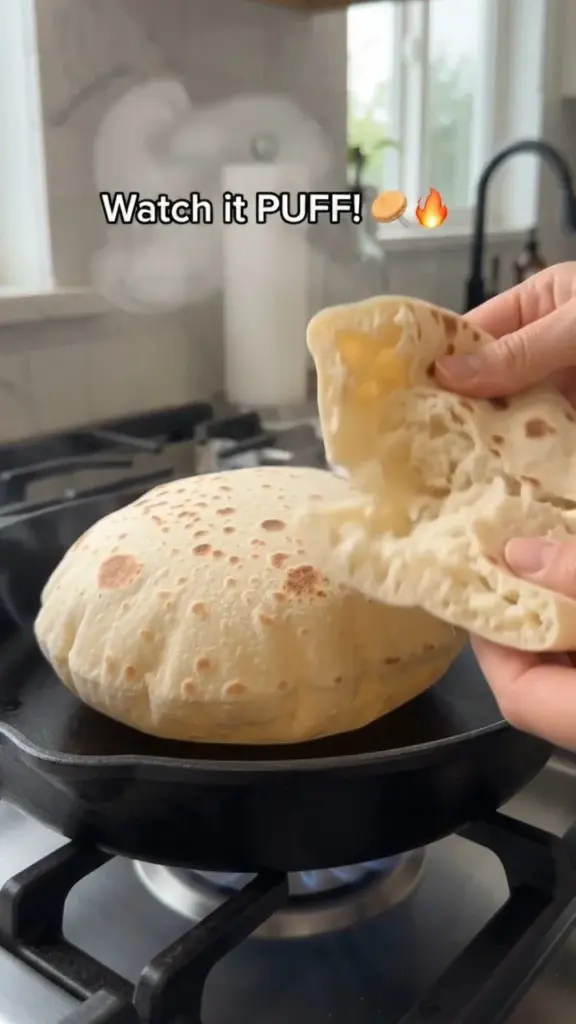
The moment you step into your kitchen, the scent of warm, freshly baked bread fills the air, enveloping your senses in a comforting embrace. Imagine pulling a soft, golden-brown pita from the oven, its exterior slightly crisp yet yielding to the gentle pressure of your fingers. You tear it open, revealing a fluffy pocket just waiting to be filled with aromatic spices and ingredients. Each bite delivers a harmonious combination of warmth and texture, a delightful dance of flavor reminiscent of bustling Mediterranean markets. You can’t help but smile, knowing you’ve created something truly special and homemade.
Homemade pita bread transforms an ordinary meal into an experience that feels intimate and inviting. Whether you’re dipping it into creamy hummus or piling it high with grilled chicken and fresh veggies, this versatile flatbread elevates any dish. Each puffing round of dough carries an unmistakable warmth, inviting you to participate in a ritual that has spanned generations. Kneading the dough feels satisfying, and the anticipation builds as you watch it rise, mirroring your own excitement for a delicious culinary journey.
Why You’ll Love This Homemade Pita Bread
This homemade pita bread is more than just a side; it’s a moment of joy, a canvas for your culinary creativity. The taste is unmatched, with each bite offering a perfect balance of a light crunch on the outside and a soft, chewy interior. The versatility of pita bread means it pairs beautifully with nearly any dish, making it a staple for all occasions. Whether it’s a casual family dinner, a potluck gathering with friends, or a sophisticated dinner party, this bread shines brightly and steals the show.
Making your own pita bread not only fills your home with the inviting aroma of baking, but it also provides a sense of accomplishment that store-bought options simply cannot deliver. Crafting these delightful puffs allows you to customize the flavors and ingredients to match your personal preferences, ensuring that every bite reflects your unique taste. Get ready to create something your family and friends will eagerly anticipate at every meal!
Preparation Phase & Tools to Use
As you embark on your pita-making journey, gathering a few essential tools will enhance your experience and ensure success.
- Mixing Bowl: A large bowl allows you to combine your ingredients without any mess.
- Wooden Spoon or Dough Scraper: These help you mix the dough effectively and handle it without the need for excess flour.
- Rolling Pin: This is necessary for flattening your dough into perfect circles.
- Baking Stone or Sheet: A preheated surface helps achieve that desirable puff in your pita bread when baking.
- Kitchen Towel: Covering the pitas as they cool retains their warmth and softness.
Preparation tips:
- Measure out your ingredients precisely. Consistency in your flour and water ratios leads to the best results.
- Allow your dough adequate time for rising. Patience allows the yeast to work its magic, leading to airy pitas.
Ingredients for Homemade Pita Bread
Creating mouthwatering pita bread demands just a handful of simple ingredients:
- 3 cups all-purpose or bread flour: All-purpose flour creates a softer texture, while bread flour will yield a chewier result due to its higher protein content.
- 1 cup warm water (about 110°F or 43°C): This activates the yeast, ensuring a healthy rise.
- 2 1/4 teaspoons instant yeast: Instant yeast simplifies the process and requires no proofing ahead of time.
Key ingredient substitutions:
- You can use whole wheat flour for a healthier option, though it alters the flavor slightly.
- Replace water with milk for a richer taste and tender texture.
How to Make Homemade Pita Bread
-
Mix the Ingredients: In a mixing bowl, combine the flour and instant yeast. Gradually pour in the warm water while stirring with a wooden spoon until it forms a rough dough.
-
Knead the Dough: Transfer the dough onto a floured surface. Knead for about 5-10 minutes until it becomes smooth and elastic. You’ll enjoy the satisfaction of feeling the dough transform in your hands.
-
Let It Rise: Place the kneaded dough in a greased bowl, cover it with a kitchen towel, and allow it to rise for about 1 hour or until it’s doubled in size. This step enhances the overall texture and puffiness of your pitas.
-
Preheat the Oven: Preheat your oven to 475°F (245°C) and place your baking stone or sheet inside to heat thoroughly. This high temperature helps create the perfect puff in your bread.
-
Shape the Dough: Once risen, punch down the dough gently to release the air. Divide the dough into 8 equal pieces and roll each piece into a thick circle about 1/4 inch in thickness.
-
Bake the Pitas: Carefully transfer the circles to the hot baking stone or sheet and bake for 5-7 minutes. They should puff beautifully and turn a light golden brown.
-
Cool and Serve: Remove the pitas from the oven and cover them with a towel to keep warm and soft. Serve immediately with your favorite dips or fillings.
Chef’s Notes & Helpful Tips
-
Make-Ahead Options: Prepare the dough a day in advance and let it rise in the refrigerator overnight. Bring it back to room temperature before rolling and baking.
-
Cooking Alternatives: If you lack an oven, use an air fryer set at a high temperature for about 6 minutes. You can also cook pitas in a skillet over medium-high heat, flipping them after a few minutes until they puff up.
-
Customization Ideas: Experiment with adding herbs or spices, like garlic powder or za’atar, directly into the dough for added flavor.
Common Mistakes to Avoid
-
Under-kneading the Dough: A well-kneaded dough strengthens gluten, ensuring proper rise and texture. Take your time to knead effectively.
-
Too Much Flour: Adding unnecessary flour will render your pitas tough. Keep your work surface lightly floured and avoid excess.
-
Opening the Oven Door Frequently: Each time you open the door, you lose heat. Bake all pitas consecutively or in batches to maintain a consistent temperature.
What to Serve With Homemade Pita Bread
Your homemade pita bread serves as a delicious companion to many dishes:
- Hummus: The classic dip, creamy and rich, pairs perfectly for scooping.
- Tzatziki Sauce: Refreshing and herby, this yogurt dip complements the warm pita beautifully.
- Falafel: Golden, crispy falafel sit perfectly inside, with a drizzle of tahini for added creaminess.
- Grilled Veggies: Charred vegetables add a pop of color and flavor.
- Shawarma: Stuffed with tender, spiced meats, this filling creates a delightful blend wrapped in pita.
- Mediterranean Bowl: Layer salads, grains, and proteins for a portable meal.
- Souvlaki: Tender skewers of marinated meat bring an explosion of flavor to every bite.
Storage & Reheating Instructions
Store any leftover pita bread in an airtight container at room temperature for up to three days. For longer storage, wrap them well in plastic wrap and freeze for up to three months.
To reheat, wrap the pitas in a damp paper towel and microwave for 15-20 seconds or place them in a hot oven for a few minutes to bring back their soft texture.
Estimated Nutrition Information
Each serving of homemade pita bread provides approximately:
- Calories: 150
- Total Fat: 0.5g
- Carbohydrates: 32g
- Protein: 5g
- Fiber: 1g
(These values are approximate and can vary based on specific ingredients and portion sizes.)
FAQs
How can I make gluten-free pita bread?
Substituting all-purpose flour with a gluten-free flour blend works for a gluten-free version. However, the texture may differ slightly. Adding xanthan gum can enhance the chewy quality.
What if my dough doesn’t puff in the oven?
Possible culprits could include underproofing the dough or insufficiently preheating your baking surface. Make sure both are adequately prepared for perfect pitas.
Can I flavor my pita?
Absolutely! Incorporate herbs, spices, and even seeds directly into the dough. Consider sumac, garlic powder, or herbs de Provence for vibrant variations.
How thick should I roll out the dough?
Aim for about 1/4 inch thick. If your circles are too thick, the pitas may not puff correctly.
Can I double the recipe?
Certainly! Just make sure to adjust your mixing bowl size and prove your dough until it has fully risen.
Conclusion
Nothing compares to the joy of pulling warm, homemade pita bread from your oven and witnessing the smile it brings to friends and family. Each fluffy, golden round opens the door to endless culinary possibilities, from satisfying dips to hearty fillings. As you embark on this delicious adventure, you become a part of a tradition that celebrates the simple pleasure of bread. So roll up your sleeves, gather your ingredients, and indulge your taste buds in the delightful art of pita bread-making—your kitchen and palate will thank you!
Print
Homemade Pita Bread
- Total Time: 75 minutes
- Yield: 8 servings 1x
- Diet: Vegetarian
Description
Transform your meals with this soft, golden-brown homemade pita bread that’s perfect for dipping or stuffing.
Ingredients
- 3 cups all-purpose flour
- 1 cup warm water (about 110°F)
- 2 1/4 teaspoons instant yeast
Instructions
- Mix the ingredients: In a mixing bowl, combine the flour and instant yeast. Gradually pour in the warm water while stirring with a wooden spoon until it forms a rough dough.
- Knead the dough: Transfer the dough onto a floured surface. Knead for about 5-10 minutes until it becomes smooth and elastic.
- Let it rise: Place the kneaded dough in a greased bowl, cover it with a kitchen towel, and allow it to rise for about 1 hour or until it’s doubled in size.
- Preheat the oven: Preheat your oven to 475°F and place your baking stone or sheet inside to heat thoroughly.
- Shape the dough: Once risen, punch down the dough gently, divide it into 8 equal pieces, and roll each piece into a circle about 1/4 inch thick.
- Bake the pitas: Transfer the circles to the hot baking stone or sheet and bake for 5-7 minutes until they puff and turn golden brown.
- Cool and serve: Remove the pitas from the oven and cover them with a towel to keep warm and soft. Serve immediately.
Notes
Customize the pitas with spices or herbs like garlic powder or za’atar for extra flavor. For advance preparation, let the dough rise overnight in the refrigerator.
- Prep Time: 15 minutes
- Cook Time: 7 minutes
- Category: Baking
- Method: Baking
- Cuisine: Mediterranean
Nutrition
- Serving Size: 1 pita
- Calories: 150
- Sugar: 0g
- Sodium: 0mg
- Fat: 0.5g
- Saturated Fat: 0g
- Unsaturated Fat: 0g
- Trans Fat: 0g
- Carbohydrates: 32g
- Fiber: 1g
- Protein: 5g
- Cholesterol: 0mg
Keywords: pita bread, homemade pita, Mediterranean bread